- UID
- 6671
- 在线时间
- 小时
- 注册时间
- 2003-7-12
- 最后登录
- 1970-1-1
- 主题
- 帖子
- 性别
- 保密
|
Basics
When a lens focuses on a subject at a distance, all subjects at that distance are sharply focused. Subjects that are not at the same distance are out of focus and theoretically are not sharp. However, since human eyes cannot distinguish very small degree of unsharpness, some subjects that are in front of and behind the sharply focused subjects can still appear sharp. The zone of acceptable sharpness is referred to as the depth of field. Thus, increasing the depth of field increases the sharpness of an image. We can use smaller apertures for increasing the depth of field.
The following shows an example. The lens focuses at the middle between the 3 inch and 4 inch marks. Thus, the 3 inch and 4 inch marks are sharp in all images. The 5 inch mark is not very sharp at F3.2, and is improved as the lens closes down to F3.6. Then, it becomes sharp in all subsequent images. The 6 inch and 7 inch marks are not sharp until F5.0 and F6.4, respectively. The 8 inch mark becomes reasonably sharp when the lens closes down to F8.0. The 9 inch and 10 inch marks are not sharp in all images; but, they become sharper as the lens closes down. For the foreground, the 2 inch mark is acceptable at F3.2 and becomes "focused" at F4.0. The 1 inch mark is not sharp until F5.6, and the lead of the ruler becomes reasonably sharp at F7.1. As you can see, the range of sharpness (i.e., depth of field) gets larger as the aperture gets smaller. Therefore, use a smaller aperture if a greater depth of field is needed. Please check the Aperture-Priority Mode to know more about the use of aperture and its impact on depth of field.
F3.2 F3.6 F4.0 F4.5 F5.0
F5.6 F6.4 F7.1 F8.0 F9.0
Click on the image to see a larger one
Why?
Suppose the lens focuses on the yellow dot as shown in the figure below. This subject generates a yellow dot on the image plane. Once focused, all subjects that have the same subject-lens distance as that of the yellow dot will appear sharp. Now, consider a white dot that is behind the yellow dot (i.e., with larger subject-lens distance). Since it is out of focus, it will not produce a sharp white dot image. Instead, its image is formed somewhere in front of the image plane. On the image plane, the image of this white dot is a circle as shown below. This circle is usually referred to as a circle of confusion. As the subject-lens distance increases, the size of this circle increases. The same holds true for a subject in front of the yellow dot (e.g., the green dot in the following figure). Since these circles of confusion are actually out of focus images of subjects, if we can reduce the size of circle of confusion, we can increase the sharpness of the resulting image. But, how?
It turns out to be very simple. Since circles of confusion are formed by light rays passing through the lens tube, the size of a circle of confusion is proportional to the amount of light that can pass through the lens tube. This means smaller (resp., larger) circles of confusion will be formed if less (resp., more) light can pass through. Restricting how much light can pass through the lens is the function of the diaphragm in the lens tube that sets the aperture values. Therefore, a smaller aperture means a smaller diaphragm opening, which, in turn, means allowing less light to strike the film/CCD plane. Thus, we have smaller circles of confusion and, as a result, a sharper image!
Hyperfocal Distance
In addition to closing down the diaphragm (i.e., smaller aperture), we can also focus at the hyperfocal distance. If a lens focuses at infinity, the depth of field starts at somewhere in front of the lens and extends to infinity. More precisely, from that point on, the scene appears sharp, and subjects between that point and the lens are out of focus. The distance from the lens to that point is referred to as the hyperfocal distance. In the figure below, the hyperfocal distance is marked with a thick red line.
After determining the hyperfocal distance, we can point the camera at this distance. The resulting depth of field starts from halfway of the hyperfocal distance and extends to infinity. This is, in fact, the maximum depth of field we can get. The concept is shown in the figure below.
Why is this hyperfocal distance important? When shooting a distant subject or scene, many people point the camera to that subject(s). The result may be satisfactory; however, in many cases the foreground looks out of focus. This is, of course, because of insufficient depth of field. Should this happen, the above technique becomes very useful: (1) focus at infinity; (2) determine the hyperfocal distance; (3) refocus at the hyperfocal distance; and (4) take a photo.
Please note that hyperfocal distance is a function of the aperture being used. More precisely, changing aperture changes hyperfocal distance.
Can We Use the Smallest Aperture to Yield Greater Depth of Field?
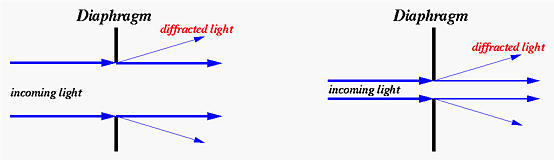
Unfortunately, the answer is "no." As the light rays passing the lens tube and the diaphragm, some may be diffracted as shown in the figures below. If the diaphragm is large (i.e., a large aperture), because the proportion of the diffracted light and the non-diffracted light is so small and is negligible, diffraction does not contribute to the loss-of-quality very much. See the left figure below. However, when the diaphragm is small (i.e., a small aperture), the amount of light that can pass through the diaphragm is reduced and hence the proportion of the diffracted and non-diffracted light becomes significant. As a result, the quality of the image is also reduced. See the right figure below. Therefore, closing the diaphragm (i.e., using small apertures) all the way down to the smallest aperture may not increase the quality of an image. In general, the quality of a lens increases as diaphragm closes down. This improvement will reach certain point. After this, quality goes down because of the impact of diffraction.
Introduction
Under the aperture-priority mode, you select an aperture and the camera chooses an appropriate shutter speed. The main purpose of using aperture-priority mode is to control the Depth of Field.
An aperture value is written in a form of Fx.y. The larger the F value the smaller/narrower the lens opening. For example, an aperture value F5.6 has a smaller lens opening than that of F2.8. For each focal length, Coolpix 950 provides you with only three possible aperture values. The following table shows the available aperture values of three focal lengths. Thus, if you use the shortest focal length (i.e., 38mm), you can only use F2.6, F4.4, or F7.4. Comparing with a 35mm SLR camera, this list of choices is too short.
Focal Length
35mm Equivalent  ossible Aperture Values ossible Aperture Values
38mm F2.6, F4.4, F7.4
75mm F3.1, F5.2, F8.7
115mm F4.0, F6.8, F11.4
Selecting the Aperture-Priority Mode
To use the aperture-priority mode, the first step is to enter the M-REC mode by turning the mode dial to M-REC.
The Mode Dial and Shutter Release Button
Now we are in the manual mode. The next step is to select the aperture-priority mode. To do so, hold the MODE button (below left) while turning the command dial (below right).
The MODE Button The Command Dial
When turning the command dial, the letter in the lower-left corner of the control panel and the LCD monitor will change (see the figure below). The possible letters are P, A and S for program mode, aperture-priority mode, and shutter-priority mode, respectively. Therefore, once A appears, the camera is in aperture-priority mode. Once the camera is in the aperture-priority mode, you can release the MODE button.
You can use the same procedure to go back to the program mode.
Selecting an Aperture
When the camera is in the aperture-priority mode, turning the command dial selects an aperture. As the command dial is being turned, an aperture value in the form of Fx.y appears on the LCD monitor and on the control panel replacing the number in the bracket. Once the desired aperture appears, stop turning the command dial and the camera will use that aperture value for the next exposure. The corresponding shutter speed also appears on the LCD monitor so that you can determine if the aperture and shutter speed combination is an appropriate one. If you are satisfied with the combination, release the shutter to take a photograph; otherwise, turn the command dial for a new aperture setting. If the camera is in the aperture-priority mode and turning the command dial does not cause the aperture to change, press the MODE button again and turn the command dial.
Why the Aperture-Priority Mode?
The use of aperture-priority mode is basically for controlling Depth of Field. The larger the aperture, the shallower the depth of field. A shallow depth of field makes the main subjects standing out. The following images were taken by zooming all the way in (i.e., focal length 115mm, 35mm equivalent). The aperture values used were F11.4 (smallest aperture), F6.8, and F4.0 (largest aperture). The sharpness of the left image, from foreground to background, does not change very much. As the aperture becomes larger, foreground and background start to blur. In the right image below, which was taken using F4.0, the background becomes reasonably blurred so that the yellow flow in the middle is isolated from the background. Note also that the flowers in the foreground are also blurred. Therefore, when you need to isolate your subjects from the background/foreground such as a portrait shot, use larger aperture.
F11.4 F6.8 F4.0
Click on the icon to see a larger image
The following images show another example of the relationship between depth of field and aperture.
F10.7 F5.4 F3.9
Click on the icon to see a larger image
图片下不了,呵呵
|
|


 京公网安备11010202008513号 京ICP证101109号 京ICP备12012021号


 发表于 2003-7-21 12:11:00


 楼主
楼主